Monday, April 29, 2013

Outdoor Chalkboard

In our continued quest to engage the children in exciting activities outside, my husband made an 'outdoor chalk board' for them using a piece of pressured treated plywood painted with black matte outdoor latex paint. After three coats of paint it was good to go!

The kids were so, so excited to have such a large space for drawing and writing. They used a 24 pack of large sidewalk chalk on the board. 


Their enthusiasm was contagious as they drew pictures and wrote words.


As they worked they discussed what they were doing, leading to some rich oral language opportunities.


Clean up was simple! A quick spray of the hose cleaned our board right off. A spray bottle with water and a rag would do the job as well. (Wouldn't this be a great outdoor piece at recess time in the school yard?) I can't wait to see what they create tomorrow!

Sunday, April 28, 2013

Outdoor Easel

In my quest to enrich our outdoor space, my husband attached a large piece of clear acrylic to our outdoor climber. The acrylic is large enough to fit two children and our hope installing it under the climber is that the children will be inspired to engage in outdoor literacy and art activities.

The clear nature of the acrylic itself is inviting because it allows the light to shine through and provides an interesting background for drawing, painting, and writing that differs from the traditional indoor painting easel. 

The first activity we invited the children to do was draw on the acrylic with Crayola 'window writers' (markers, crayons) that act like dry erase materials and are easily cleaned off a clear surface.


There was much excitement to do this and they worked together to explore the materials. The acrylic is attached just underneath the climber in a space that often isn't used - I'm hopeful that it might act as a prop to encourage further play here...


Erasing was easy...just a few swipes of a dry cloth!


I'm envisioning the amazing possibilities with this new play feature - it will be easy to affix a piece of paper to the acrylic to encourage more drawing, writing, and even painting outdoors!

Tuesday, April 23, 2013

First Marks: Overcoming our fear of messiness

Our nine month old baby noticed a bit of food drop on his tray when I was feeding him the other day. Instinctively he reached out to grab at it and was amazed when he wasn't able to hold the mush but instead succeeded in smearing the food on his tray. This important discovery was the first in his lifetime of writing - the observation that his actions could leave a mark on something. He was eager to continue dabbing at the food.

I was also eager to encourage him in this inquiry - what would happen when he was provided a large drop of smashed carrots?  After I spooned them onto the tray he looked at me with surprise and tentatively reached out to touch them.


It didn't take long for the grabs to become swipes as both of his hands explored.


Much to his delight I added another scoop of food - peas - and he was able to explore two different colours of edible 'finger paint'.


His first instinct is to put anything in his mouth, but I noticed with this experience that he was more interested in exploring the food on his tray. He ran his fingers and hands over and over through the food and was very interested in watching what happened. I modelled some swirls for him using my fingers to draw in the food first and then swirling together with him hand-over-hand.


His first writing experience was a success and I know how meaningful providing early literacy experiences like this are for babies. I'm hoping to do this again soon!


Often people are uneasy with a little mess in their lives. As a kindergarten teacher I have heard time and time again a fear expressed by adults over kids becoming too messy if they play with paint, clay, and mud. However embedded deep within these messy experiences (other than the pure joy of being messy) is an understanding of how the world around us works and a desire to continue to master these experiences in a quest for knowledge.

If you don't believe me, just ask Quinn!


Monday, April 15, 2013

Colour Chip Rings

We used some simple materials to make colour chip rings - an assortment of paint chips, a whole puncher, and some shower curtain rings.


We explored one colour at a time. I spread each paint chip on the table and invited the kids to sequence them from darkest to lightest.


Once ordered we secured the sequence by punching a hole in the chips and putting them on a ring.


These colour collections can now be used to match and compare colours. In this picture we are finding the shade of blue that best matched Caleb's shirt.


Here Cadence is finding the shade of green that matches our center piece.


These rings would be great tools for an outdoor spring scavenger hunt, similar to when we matched colours in nature.

Friday, April 12, 2013

Sand Play Dough and Shells

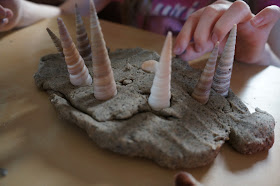
I hope wherever you are there has been sunshine and warmth. Unfortunately Southern Ontario still looks a lot like winter. While dreaming of the summer I decided to create some sand play dough for a little beachy fun with the kids. We just added a cup of play sand to our normal play dough recipe. 

I presented the activity to the children using a wooden sorting tray filled with interesting shells.


Using only play dough rollers, the dough and the shells, the children were invited to explore and create whatever they liked. 

At first they were interested in the patterns the shells made when pressed into the dough. After exploring the materials for a while they began imagining a bit deeper about the meanings behind their creations.


"Here's our family Momma! Here's you, Daddy, me..." Caleb points to each shell and names us off one by one!


"I made little holes in the sand where the moles are hiding!" Cadence laughs as she recalls the story I told her earlier about the creatures who are eating the seeds under our bird feeder outside.


"Just a pretty design Momma. I like the little shells going around and around."


"Like the teeth of a monster!" Monsters have been a bit hit in our house recently for some reason!

Loose Parts Provocation with Mirrors

I have been interested in exploring the use of loose parts with the children at home. After gathering some simple, versatile materials I set up an inviting provocation for exploration. I used two acrylic mirrors as 'mats' that would be each child's building space.


The materials were organic and each child was very interested in creating. At first the designs were simple.  


After a few attempts they realized that the pieces could be interpreted and used together to form interesting pictures.

A few faces...


A garden...


A roller coaster...

  
Someone's name...


I was amazed at the level of interest and creativity that a few ordinary materials could provide. I believe part of the appeal in this experience was the use of the mirrors, which reflected the pieces back and created interesting effects depending on whether the light hanging above was turned on. In a few days I plan to add a few more materials to the collection and see how they influence the play!

Thursday, April 4, 2013

Tissue Paper Stained Glass

We haven't used the light table for a few weeks so I put out some tissue paper (kept neat and tidy sorted in a vegetable serving tray) and covered the light table with sticky clear contact paper. We've used the sticky plastic covering in lots of other projects (Stained Glass PatternsSigns of Fall Nature Collage). 


Cadence was immediately drawn to the activity and began to experiment with placing the tissue on the light source. Because it's so thin, the light from the table illuminates the tissue and gives it a pretty glow.


Cadence spent some time adding the tissue squares to the table and observing how the colours seemed to 'mix' when overlapping and created new shades. It was also interesting to hear her discuss how the pieces looked when on top of each other. She noticed many new little shapes emerging. Because the contact paper does not dry out, this activity remained on the light table for long and the kids could come and go as they pleased, adding squares to the collage as they wanted.


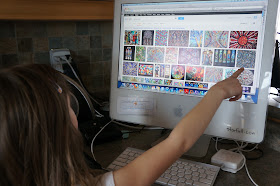
I spent some time discussing the art with Cadence and telling her that it reminded me of stained glass. We did some research online and found many beautiful pictures of stained glass art from around the world. This lead to a great discussion about how stained glass is made. Cadence decided she wanted to make some stained glass that had a definite design within it and she came up with a plan for how to do so.


First she drew on the clear contact paper (with the backing still on) using a permanent marker.


Then we carefully peeled the backing off and placed the design on the light table, sticky side up.


She began to fill in the design using different colours, being careful to stay as close as possible within the lines.


The result - a beautiful piece of stained glass artwork!


We hung it in her bedroom window so that she could enjoy it further. We also love displaying our children's artwork around the house in interesting places so that they feel valued and their art becomes a part of our home's culture and decor.