Thursday, November 29, 2012

Tub Painting

Such a fun and easy way to encourage creative exploration and play during bath time that is super easy to clean too!

We used a plastic veggie tray for our palate.

The kids helped me to squirt a bit of shaving cream in each section.


Using a few drops of food colouring, they chose different colour combinations to try.


We used paint brushes to stir the colours and shaving cream together to see what colours were created.


The tray actually floated on the water!


They had lots of fun painting all over themselves and the walls of the tub. (You might want to do a spot check the first time you paint to make sure the colour doesn't stain your tiles or grout.)


We used thick paint brushes this time but we've also tried other art tools like sponges.


Super easy to clean when done...just rinse the walls and tub with warm water. It smells great too!


This is easily modified for the classroom where children can paint in a half-filled water table, tiled wall and sink area, or the clear lid of a tactile table!

Monday, November 19, 2012

Mirror Building

I have been reading a lot lately regarding the use of mirrors to enhance exploration and creativity in Reggio Emilia inspired activities and I was eager to try this with my children. We just rediscovered some wooden blocks and I set them up next to a flat mirror on our living room floor.


My children were a little apprehensive at first to try this activity. I encouraged them to be gentle with the mirror and ensured that I was close by to supervise - I knew my daughter would understand the fragile nature of the mirror but wasn't so sure my three-year-old son would.

The children instantly noticed their reflections on the smooth working surface.


It was hard to tell where the real structure ended and the reflected one began...


In addition to a neat mini-lesson on reflective surfaces, this activity allowed me to discuss the differences between 2D and 3D shapes and introduce some terminology (e.g., cube, triangular prism). It was also interesting to see my children problem solve how to stack the blocks so they did not fall as their towers got taller. You'll notice the 'sidewalks' my son created that joined the structures together. He had a wonderful imaginative story for why the inhabitants of the structures needed to be able to visit each other.


For a great article on how block play encourages numeracy, visit Block Play, Math and Literacy.

Sunday, November 18, 2012

Christmas Sensory Bin

We have Christmas fever around here now that the autumn decorations have been packed away. I decided to create a Christmas sensory bin for the kids to explore. I used trinkets that I found at the local dollar store (bells, bows, garland, beads, pompoms, etc.) and put them together with a mini Christmas tree, some gift bags and miniature boxes.
   

There was so much to look at and touch! The bright, shiny objects were very appealing!


It was fun to put together 'gifts' for people! The sensory box had much math potential as my son had to figure out what objects fit in the boxes, which box lids matched the box bottoms, which length of ribbon would fit around the boxes in order to secure them, and the different ways we could sort objects into the bins.


It was also fun to decorate the little miniature Christmas tree with the materials in the bin! This was a favourite activity since the kids have been asking when we are going to get our tree as they are so excited to decorate it. This gives them lots and lots of time to explore decorating in their own way.


Because the materials are so small, decorating the tree proves to be great fine motor practice too!


Saturday, November 17, 2012

Sorting Writing Materials

Frustrated with how our art materials have been stored around our house, I decided to have the kids organize the writing materials in a way that would be meaningful and aesthetic.

This is what they used to look like...not very inviting at all. 


We decided to organize them by colour using a large wicker basket and small clear drinking cups as holders.


Instead of worrying about what type of tool it was, we decided to sort by common colour.


This lead to some rich discussion about how one colour has many different shades and how some colours can fit into many different groups (e.g., aqua blue could be placed in the green or blue group).


The result! A beautiful, inviting way to store our writing tools that looks nice displayed on a living room shelf. I've noticed the kids have been very keen to draw pictures and writing letters since spending time sorting!


How do you organize your writing tools?

Wednesday, November 14, 2012

Portable Water Play

Water play is usually a big hit around here, with bath time being a favourite. Last year I actually brought the water table from the backyard in our kitchen for the winter so that the kids could still have water play. It was cumbersome and got in the way. This year I decided to try something different.

We have a small wooden Ikea children's table. I placed a very large, clear plastic storage bin on top to create a portable water table. The bin is just the right size to hold enough water to sustain lots of creative, exploratory play, and I love that it's clear so the water and materials can be seen from the side. This would be a great solution for anyone wanting to encourage their children to engage in water play but do not have or want to spend the money on large wooden water/sand tables.


I love adding colour to water play by using food colouring. It adds another dimension to the sensory play, and it's great for mini lessons on colour mixing. Caleb decided he wanted to make green water, so I encouraged him to add yellow food colouring to the water.


He then added some blue food colouring...


...and was amazed as he mixed the colours and they turned green!


Although I have brought in some of our outdoor water table toys, I added in every day tools from around the house like spoons, cups, and funnels. This was a great way to introduce new vocabulary by naming the tools (e.g., graduated cylinder, funnel) and engaging in a discussion about how they might be used.


Monday, November 12, 2012

Speech Bubble Writing

If you're like me, you have hundreds of printed photos with no real purpose. I usually keep them in a large box and the kids like to go through them once in a while. This past weekend we decided to use them as motivation for writing. 

Each child went through and chose their favourites.


Using a pre-cut 'speech bubble', Cadence wrote what she thought the person in the photo might be saying. It was a great mini lesson on what speech bubbles are, what the context of a picture is (the people, setting, activities, etc.), and what a good statement might be. We discussed how some statements might be factual to help describe the picture, and others might be fictional and meant to entertain.


I loved reading what Cadence decided to write for each picture!
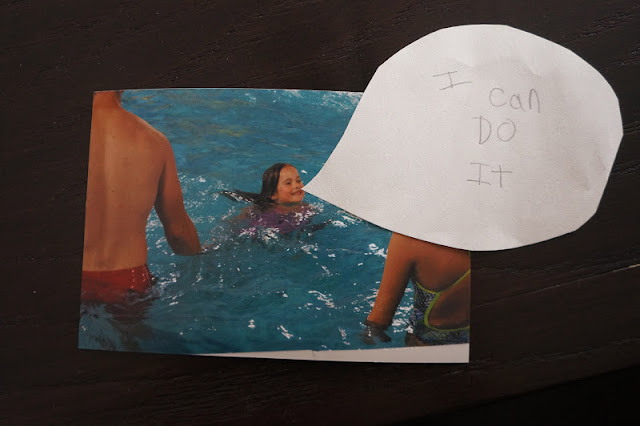


Caleb did some writing too!


In addition to being a fun way to use up old photos and encourage writing, teachers who use photos for assessment purposes might consider using speech bubble writing to help children reflect upon their activities in photos, and then add these to children's portfolios or a documentation panel in the classroom.

Friday, November 9, 2012

Real Life Retell

I have been eager to incorporate some technology into our daily activities so when the kids carved their pumpkins, I thought it would be the perfect time to bring out the ipad and encourage my daughter to record the experience by taking some pictures.

As we participated in each stage of jack-o-lantern making, Cadence took a picture. It was a little tricky to do due to the size of the ipad.


We then transfered the photos from the ipad to the computer. It was a great mini lesson on technology and what happens to digital photos when we are ready to use them. Cadence took her time analyzing the photos and choosing the ones she wanted.


We printed them and then she spent some time writing about what was happening in each picture.


We then spread them out randomly on the floor and Cadence practiced sequencing the pictures according to their order.


This was a great way to practice sequencing/retelling a familiar story using technology as a way of capturing the events. I found that because Cadence had taken the photos herself, she was very invested in the activity. I also liked that it was an easy way to infuse some technology into the activity. Once we are done playing with the pictures we are planning on making them into a "How to Make a Jack-o-lantern" book to be kept on our bookshelf for future reference and reading enjoyment.
Related Posts Plugin for WordPress, Blogger...