Tuesday, November 6, 2012

Rainbow Sand

We had some left over coloured sand and I thought it would be neat to explore it on our light table . I covered the table with a clear garbage bag in order to protect the surface from getting scratched and also to make clean up easier. 

The rainbow presentation made it immediately appealing to my son, who couldn't wait to get his fingers in it.


As he slowly and carefully swirled his finger, he mixed the colours together. They looked like a 'colour explosion' he observed!


The light from below shone through the sand, illuminating it in places where it wasn't as thickly layered. My son loved the feel of the sand and spent a great deal of time grabbing it and letting it trickle through his fingers.


After a while he decided that he wanted to do some writing in the sand. We practiced the first letter of his name over and over.


We also used other materials to create the letter "c". Here we layered rocks on top of the "c" he had already printed in the sand.


This would be a great tactile experience for anyone wishing to engage children in some small group or individual letter writing/identification work, especially those of you who engage in RTI experiences in your classroom. Children would be motived to participate by the nature of the messy materials, use of the light table, and tactile experience of constructing the letters.

Sunday, November 4, 2012

Stained Glass Patterning

I have become a huge fan of attaching clear contact paper to our back windows in order to encourage creative building. We have used our translucent coloured pattern blocks on the light table and I wondered what my son would do if I encouraged him to use them on the back door.

He was immediately drawn to the experience and began to build, fitting the pieces together and commenting on how they appeared to 'glow' as a result of the sunlight filtering through them.


I was amazed at his ability to fit them together as if they were a puzzle.


With my assistance, we created some simple patterns within the larger design - it was a great opportunity for me to discuss the shapes, colours, and sizes of the pieces.


The coloured pattern blocks resembled beautiful stained glass. It was just as much a piece of modern artwork on our back door as it was an exercise in puzzling.


The best surprise of all however was when the mid-afternoon sun illuminated the artwork, sending colours dancing all over the floor as well. Caleb loved to step in and out of the colours, inspiring another dimension to our conversation about sunlight and coloured pattern blocks!


What a fun way to replicate, extend, and explore patterns!

Tuesday, October 30, 2012

Messy Monster Muck!

I first heard of this monster inspired sensory bin from No Time for Flash Cards and thought we'd give it a try. It only requires four simple materials that we already had in the house.

First, squirt a lot of shaving cream into a bin. 


Next, sprinkle a good size amount of cornstarch into the shaving cream and mix well. Depending on your desired consistency, you may have to add lots. We used an entire box of cornstarch between two bins. Mixing it takes some time and patience and may require a helping hand depending on the age of the children.


We used the suggested materials of googley eyes and pipe cleaners, but you might consider adding other fun stuff like pony beads, feathers, and sequins.


When added to the bin, these materials add another dimension of sensory fun. My three year old was happy just to explore the materials - squishing and squashing the muck through his hands.


The shaving cream/cornstarch mixture is mouldable and my daughter was eager to begin creating little creatures with the materials.


This was a very messy activity but it was easily cleaned as the mixture turns into a powder when dried. I just vacuumed it up!

Marbles

When searching our basement for some Halloween decorations, we stumbled upon an old collection of marbles. Caleb was fascinated by them and was eager to bring them upstairs to explore. We decided to place them on our light table in order to see them a little more clearly. 


The light from the table illuminated the marbles, showing off their variety of colours and highlighting the embellishments found within. They were quite beautiful! Caleb noticed the colours and was eager to point out to me the ones he recognized. He also sorted the marbles by colour and size and described his favourites.


The smooth surface of the light table was also perfect for spinning and rolling the marbles and Caleb enjoyed flicking a few at a time and watching them ricochet off of each other. It was interesting to observe this 'cause and effect' game that he had created.


Finding the marble collection just proves that it doesn't take expensive games or elaborate activities to encourage discovery, creativity, problem-solving, and rich opportunities for oral language. If we trust young learners with a variety of interesting materials, they will teach us about the possibilities!

Thursday, October 25, 2012

Spooky Fun in the Tub

Nothing screams spooky fun more than tossing a few plastic eyeballs into your children's bath water. My kids have spent hours playing with these in their tub! We even coloured the bath water with blue food colouring to make it more interesting. Using bath time as a way to encourage creative play is a great way to help your child experiment, explore, and create with water and any other fun materials you can think of!


Plastic eyeballs would also be a great addition to any classroom water table - right in time for Halloween!

Surprise Salt Tray Printing

Finger printing in fun materials like salt, sand, paint, flour, and hair gel is a great way to encourage literacy experiences for young, tactile learners. In my experience anything messy is immediately going to be a hit with many children.  We have been exploring letter recognition around here lately. I decided to update an old favourite.

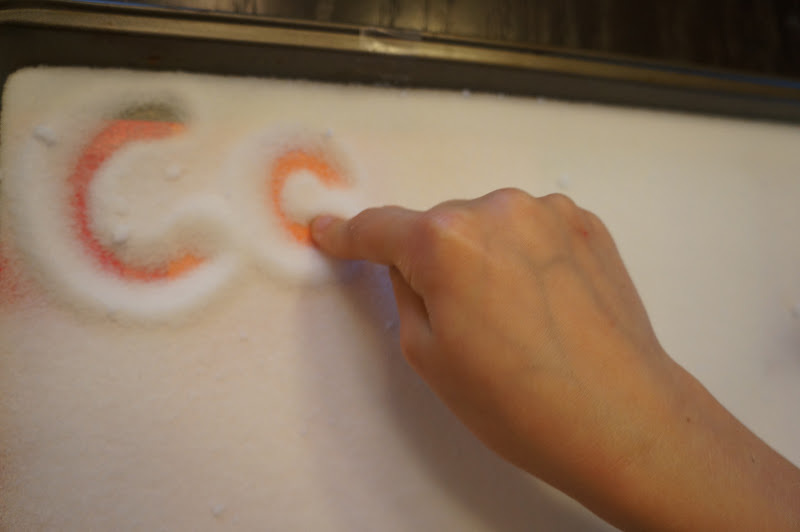
I filled a ridged baking sheet with fine salt (with a surprise taped underneath).


As my children explored the salt, a rainbow background was revealed in their prints (it was simply construction paper taped underneath to resemble the colours of the rainbow). My children were amazed at the rainbow colours that they would be rewarded with upon drawing and fingerprinting in the salt. "It's magic!" exclaimed Cadence as she printed her name.

Both spent lots of time exploring the trays and engaged in many activities including...

...creating random designs


...writing their names

...practising letters

...practising high frequency 'words of the week'

...even writing numbers

Surprise salt trays would be a motivating way to encourage children to practice letter printing, letter recognition, and writing high frequency words for those teachers who are interested in exploratory ways of engaging their children in RTI activities.

Wednesday, October 24, 2012

Name and Letter Recognition

We have been working on practising name recognition/writing and upper and lower case letter recognition around here. Because the light table is such a hit, I thought we'd combine these into some fun activities.

First I wrote Caleb's name on some acetate we had around the house. I used a black permanent marker. 


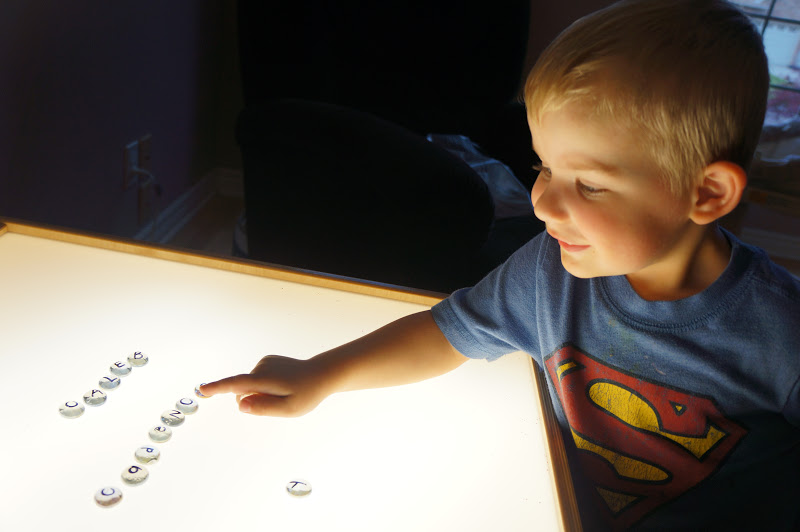
Caleb was eager to 'spell' his name using some special stones. As he worked we discussed the name of the letters and how they were shaped. He was excited to see how beautiful the name became as he completed each letter.


I also used a permanent marker with some clear, decorative stones to create alphabet stones for the light table. We put them on the table in a big group and played 'I spy' together ("I spy the letter 'L'").


We then found the letters in Caleb's name and wrote that together.


He was also eager to spell his sister's name.


We then sorted and grouped the letters, discussing which were upper case and which were lower case.


Any of these activities would be great for children who are in need of additional support for name recognition/printing and letter recognition. Using the light table is very enticing to many - specifically those children engaging in RTI activities during small groups or playtime! 

Tuesday, October 23, 2012

Illuminated Sand Art

We found an interesting way to create art with our light table - illuminated sand creations!

Cadence drew a picture of a butterfly on a clear garbage bag using a permanent marker.

 
Once she was happy with her design, we placed the picture on the light table. Slowly and carefully she scooped and poured coloured sand onto the butterfly.


The result - a colourful picture that appeared to glow as the light from the table shone through it. Beautiful!


After we admired the picture we collected the sand in a bag and are saving it for our tactile bins - it will be fun to use with scoops and funnels!

Signs of Fall Nature Collage

Fall is our favourite time to head outdoors and enjoy the changes happening in nature all around us! Over the last few days we have spent time observing, enjoying, and gathering 'signs of fall'. We visited some of our local parks and our own backyard to gather leaves, pinecones, twigs, acorns, sticks, and flowers. Visiting many places allowed us to observe much variety in the kinds of changes happening in nature, and to collect a variety of materials.


In our own backyard we used scissors to gently remove some of the 'signs of fall' that we liked - an option not possible in the parks.


Our final collection contained a large variety of colours, shapes, and sizes of materials....it was beautiful!


We spent time placing the materials on the light table in order to explore them further. The kids immediately noticed that when the light shone through the leaves, their veins were visible. This lead to a neat discussion on how plants get the nourishment they need in order to thrive, and a comparison of the various leaves we collected.


After a while Cadence began to use the materials to create pictures. Can you see the girl holding the flowers in the picture below?


After observing the materials on the light table I wanted to encourage the children to create a nature collage on the back windows that they could enjoy over the next few days. I thought that placing the collage on the window would allow the natural outdoor lighting to filter through the objects, similar to the effects of the light table, and it would help beautify that space in our house. I used sticky contact plastic (from the local dollarstore) and adhered the plastic so the sticky side faced outwards. The children each had their own pane of glass and carefully selected items from our 'signs of fall' collection.


The final product! We left the materials on our doors for one week. It was interesting to see how they eventually dried out as time went on, leading to more discussions about the needs of living things.


Related Posts Plugin for WordPress, Blogger...